I guess a post on Valentine’s Day has to have love in the title somewhere, doesn’t it?

Speaking of love, I made this quilt for my sister’s gorgeous baby boy. I could eat that kid’s cheeks every day of the week, he’s such a cutie.
A quick discussion with my sister told me that she would probably appreciate something classic in a Tiffany blue, to match the little guy’s nursery. I’d wanted to turn this lattice design into a quilt block for a while and this seemed the perfect occasion.
I quilted it quite densely with freehand straight lines – just using the walking foot width as my guide.

It gives such a great texture.

For the back I went with a more traditional patchwork look.


I don’t think I have a fat quarter of light blue left in my stash now.


I cut circles in various neutral tones with my AccuQuilt Go! Baby fabric cutter and raw edge appliquéd them in place.

I really love the lattice pattern and hope that my sweet little nephew has a lot of fun dragging it around the house.

The design is created with two blocks: a plus block and another containing the hollow square. You have to be mindful of matching the white lines when sewing the blocks together, but that’s about the trickiest part. These blocks also lend themselves to chain piecing too, which I’m rather partial to.
Assumptions:
1. Quarter inch seams are used throughout.
2. No more than two glasses of wine drunk at any one sewing sitting. No restrictions on chocolate.
It all begins with a bit of this:
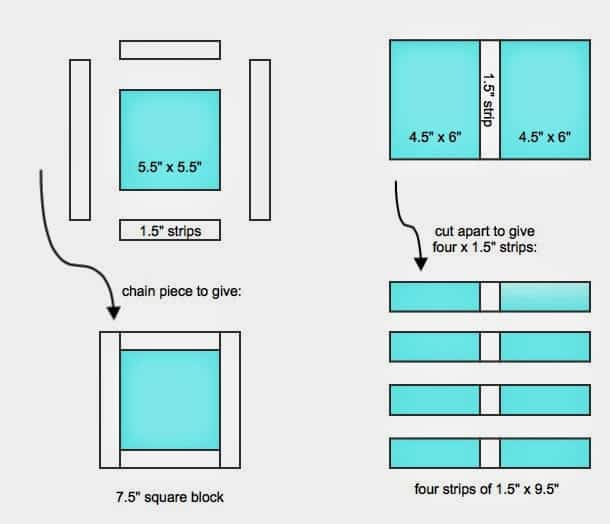
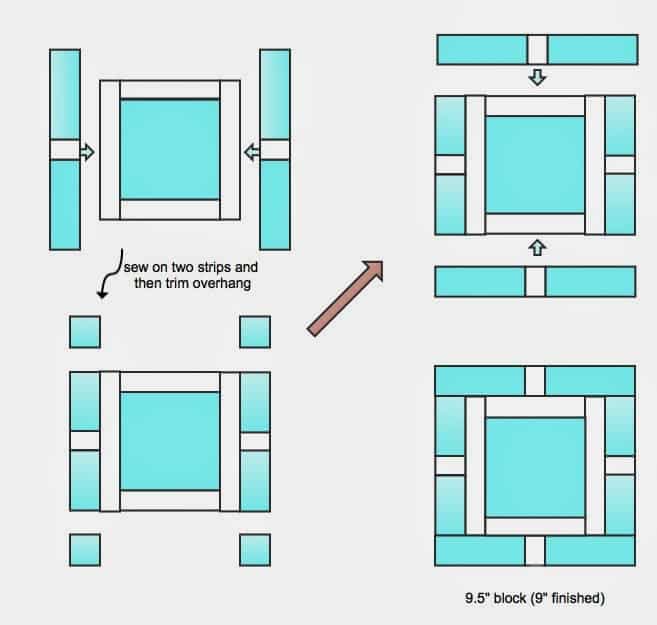
Then you take the four strips created and sew them around the square:
The final block is a simple plus block using dimensions as follows:
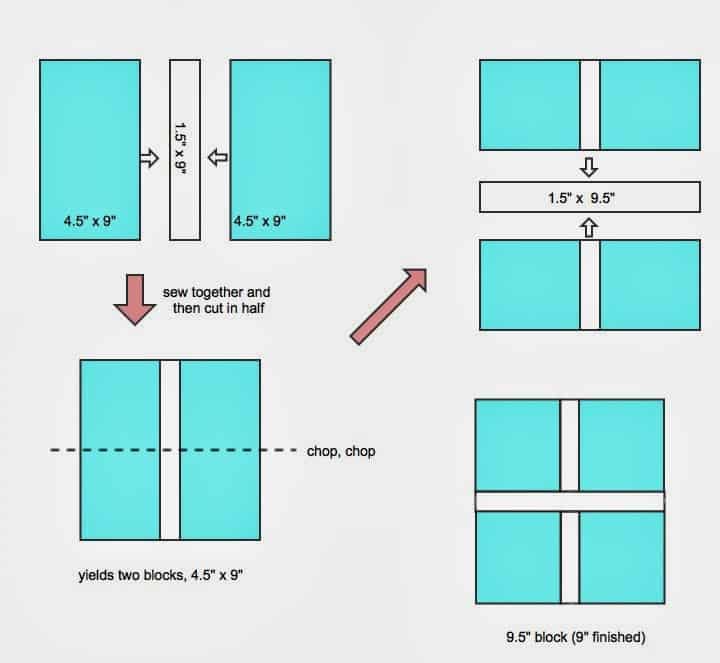
Both blocks should be trimmed to 9.5 inches.

Then it’s as simple as sewing alternate blocks together until you get the size quilt you’d like.
I wouldn’t mind trying this on point at some stage, too. I think it makes for some interesting shapes:

Happy quilting and Happy Valentine’s Day, lovers!


I love geometrical patterns. And the baby blue colour is so soothing. Thank you for sharing.
Hi Mary, yep, you’re right – it should be 7.5″. The error didn’t carry through to the next diagram though, so the final block size is still 9.5″. Thanks for pointing that out!
It’s updated now.
Hi, just checking, I was making this pattern, and in the first step with the 1 1/2″ strips going around the 5 1/2″ color square, I come up with a 7 1/2″ square not 6 1/2″. I think it’s a typo, but others might get confused also. Please let me know if the 6 1/2″ is correct or the 7 1/2″ Thanks
I think you’re right. It’s got to be 7 1/2.
Thanks so much for the fantastic tutorial! I used your pattern to make a quilt for my nephew arriving in May/June and I just love, love, love it! I posted pics on my blog, but wasn’t sure if it’s okay to link to it here. If you check it out, I hope you like! Thanks again for sharing your ideas!!
Hi Kirsty, I’m linking to my blog, Leland Ave Studios, so that you can see my quilt here in the comments! Hope it works!
Thanks Kim! It’s great to see the pattern in another colour layout.
I’ve been following you for awhile and love your sense of fun and style. This quilt is to die…can you tell me what type of thread and stitch length you used for the quilting? It’s great.
Nothing exotic, I’m afraid, just plain old Gütermann thread. I used a long stitch length – No 4 on my Janome.
This quilt is wonderful front and back! I love the texture that the quilting added and love the colors too. I bet you’ll be putting some more back into your stash at some point :-)
Love at first sight! Thank you so much for the tutorial!
Beautiful quilt and such perfectly matched blocks!
Such a beautiful and timeless quilt – front and back! Such lovely colours, too! I also love your process pics, they are interesting and pretty as well. I’m always a bit lazy to take some process pics, I really should make the effort more, since I love to see them on blogs. And thank you for the great tutorial!
This is so pretty! And perfectly aligned! Do you have approximate yardage requirements for the lattice side, as far as for the size quilt you made? Love the tutorial.
Hi Kathy, I used around 2.25 yds of the azure and a 1.5 yds of the white.
Oh Kirsty, STUNNING!!!! I adore both side so much. You are such a clever quilter. How are your sweet children? Love Sarah xx
It’s two beautiful quilts in one, Kristy! Wow. Such a fantastic design and looks wonderful in Tiffany blue. Thanks so much for the great tutorial.
I love this! Such a clever quilt; thanks for sharing the tutorial :)
What size are the squares on the back? This is so beautiful. Would love to make one in lavender tones for a co-worker’s new baby girl.
Hi Sue, my squares on the back are 5″ when finished, so I cut 5.5″ squares. You might notice that each square on the outside edge is actually a rectangle – this was just to make sure my backing was comfortably bigger than my quilt top.
Hi Kirsty,
I’m a beginner but I’m so in love with this quilt – I have to try it. I’m going to use Fat Quarters for the back traditional patchwork look. To clarify you said you cut the fabric in 5.5″ squares then sew a 1/4″ seam. Is this correct? Do you know how many squares you ended up with?
Any tips for a beginner? LOL
Hi Caren – I made and gifted this quilt many years ago so unfortunately I can only look at the photos the same as you. So what you see is what I know! But the grid is 11 x 9 squares, and reading the comments it seems I cut the outside ring of squares as oversized so that I could have a backing larger than the quilt top. Hopefully you can wing it from there! :)
I just used my cutting board. I had the square on the board, lined up with the markings, then I could see where to put the white part of the strip so that it was central. I’d use a single pin to hold the two pieces in place as I took a pile to the machine. I ended up doing that for the second pair of strips too, as I have been known to have irregular seam widths from time to time. Especially when wine’s involved. Hope that helps.
Hi Amanda, I used Kona’s Azure for this one.
This is so beautiful both the front and the back. One question I have, in the second section when you attach your blue and white strips to the block you made in step one (the step where you chop off the overhang). Are there any tricks to making sure your white lines on each side line up?
[email protected]
Hard to say which side I like better! What a lucky boy :) Thanks for sharing such a brilliant tutorial and pattern!!
This quilt is gorgeous (both the front and back!!) Thanks for a wonderful tutorial too. Can you please tell me what fabric you used for the Tiffany blue solid on front?
Thanks!
Amanda
Fabulous Tutorial!! I love that you introduce a bit of humour alongside the clear concise instruction.
Great colour choices btw!
I really like this modern design on the quilt :)
This is truly lovely! All my favourite colours!
If there was ever a craft i wish i could learn, it would be the art of quilting… Cuz this is serious art! Beautiful.
It’s beautiful! I’m rather partial to Tiffany blue myself – will have to put this one on my list. Just as soon as my chevron quilt is finished ;)
Wow! That really is fabulous. Go you!
Tiffany…my favorite shade blue, and what a brilliant pattern choice for a baby boy. I featured your post on Craft Gossip http://quilting.craftgossip.com/tutorial-lattice-love-quilt/2014/02/16/.
Thanks for creating a tutorial for your readers.
Scarlett
This is a really beautiful quilt Kristy! I can’t truly say which side I like better, and it’s lovely of you to share your awesome tutorial.
Great quilt, both front and back! Thanks for sharing the tutorial on this!
Beautiful job!! I love the pics, too. It’s on my mental someday list!
Wow. That is beautiful! What is the finished size of the quilt?
This one came out 54″ x 45″, but you could easily keep adding on blocks to get the size you need.
Your quilt is stunning. The back is wonderful too. What a shame you’ve used up all your light blue scraps… you will have to go fabric shopping again. I’m intrigued by this pattern, thanks for sharing the instructions.
This is absolutely beautiful! I’ve been searching for a design to use with the new Mormor by Lotta Jansdotter and this might be the one! Thank you so much for the wonderful tutorial.
I love this! Think I might have to make an adult sized one for myself. Thanks for the tutorial.
Tiffany blue? Expensive tastes for a wee boy ;o)
I like the back as well as the front!
I love both sides of this quilt!
Love the turquoise blue.
I love chocolate but I could not eat it while making a quilt: I’m a stain queen!
All those beautifully straight lines: I bet you had a bottle of wine to keep this consistency!
Great gift!!
Wonderful!! I am sure the little man will love it!
Love the circles on the back!
I’m with you on the chocolate, but 1 glass of wine and I would be under the sewing table!! Lol
This is lovely Kirsty! It’s a great two sided quilt! Not sure chocolate and quilting mix, especially on a warm Summer’s day though! (Your new header is fabulous too!)
Wow… a lucky nephew to have something this beautiful to snuggle under.
Love the new “logo” and header. Clever!