I have a fun free baby quilt pattern for you today. And bonus – it’s also a fat quarter friendly baby quilt pattern. Yay!
Almost two months ago I was lucky enough to be asked by Sew Mama Sew if I’d like to contribute a project for Cloud 9 Fabrics’ soon-to-be-released fabric line, Wildwood.

I said yes please, emailed them an idea and was very excited when I found the project had been accepted to participate in the Wildwood Challenge.
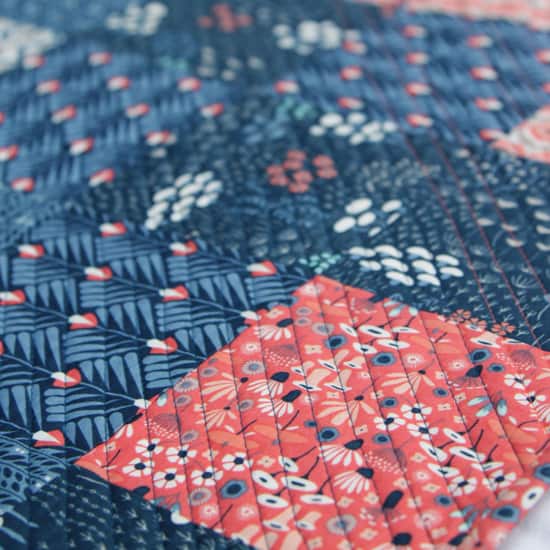
The fabric arrived in August and it had the same beautiful, crisp hand I’ve come to expect from Cloud 9 fabrics. The colours are very on trend – love the navy and coral.
So, what did I make? A baby quilt of course! I wanted to keep it simple and show off every single print from the line. I also liked the idea of being able to use a fat quarter bundle.
Colour gradations make me very happy, and that’s what I’ve attempted here.

I quilted it with parallel diagonal lines, using my walking foot edge as a guide. Initially I was going to quilt the whole thing in a neutral beige colour, but when I found I had spools of navy and coral that matched exactly I thought I should incorporate these, too (which I did randomly).

I used a scrappy binding, taking the time to match the binding fabric to the fabric at the quilt’s edge (not exactly as I didn’t want overlapping seams, but close enough). I really like the effect.

If you would like to make a Wildwood crib quilt (50″ x 60″) of your own, then this is how to do it:
Step 1: Buy a fat quarter of each of the 12 fabrics in the line.
Step 2: Cut 10 x 5.5″ squares from each fat quarter, like this:

(Reserve the rectangular off cut – you can cut your scrappy binding strips from it; 3 strips of 2.25″ x 11″.)
UPDATE TO CUTTING INSTRUCTIONS: A couple of people have noted that their FQs don’t quite make the 22″ x 18″ size needed for the above cutting method. Please measure your FQs before cutting and if they come up short you have two choices:
a. Reduce all the squares to 5.25″ – then they will fit into the fabric you have available. (This will reduce the final size of the quilt to 47.5″ x 57″ which is still a generous baby quilt size).
b. Cut 3 x 5.5″ squares from each row (not 4 as shown above) and then piece your final square from what you have left over. I know purists will shudder at this – but you’re already chopping fabric apart just to sew it straight back together, so it’s not a stretch to piece the 10th square!
UPDATE OVER AND OUT
Step 3: Take your 120 x 5.5″ squares and arrange them in this order:
1.Climbing Vine Khaki 2.Pretty Posies Coral 3.Forest Floor Khaki
4.Full Bloom Coral 5.Wildflower Crimson 6.Deco Petal Navy
7.Midnight Flora Navy 8.Climbing Vine Navy 9.Full Bloom Indigo
10.Forest Floor Ivory 11.Pretty Posies Turquoise 12.Deco Petal Turquoise
Where you have squares of the same fabric next to each other, turn one of them such that the pattern is not running the same direction across both squares:

Step 4: Sew your squares into rows, and then sew your rows together. Make a backing then baste, quilt, bind and enjoy!
Confession time: I didn’t use a fat quarter bundle. As often happens when I make plans, I wasn’t able to get a fat quarter cut of each fabric. I had to take a one-third yard cut instead (I know, terrible, right?). This gave me some left over fabric which I used to piece part of a backing:

The rest of the backing was pieced with Kona Raffia yardage.
I have no pattern to share for the backing. Frankly, it was a major pain in the posterior to piece and I won’t be doing it again. It took a lot longer than the quilt top to make and about half way through I cursed myself and wished I’d used a whole cloth instead! Oh well, this is how we learn, right?
The one thing I will say is that all those diagonal seam lines were handy for staying on track when I was quilting.
There you have it – a Wildwood Crib Quilt, fit for any young bub! I hope you enjoyed this free baby quilt pattern.

Thank you so much to Sew Mama Sew for the Challenge, Cloud 9 for the fabric and Elizabeth Olwen for designing such loveliness.
You can see what the other Wildwood Challengers get up to by checking out their links below:
Carolina Carero from Love, Lola
Elizabeth Singler from Mamma Can Do It
Jennifer Waaraniemi from lea & lars
Heidi Staples from Fabric Mutt
Ren Murphy from The Inspired Wren


Where can I get this free pattern? I scrolled all the way down and did not see where I could click on tab to download it.
Thank you so much for this pattern, it’s exactly what I’ve been looking for to do a gradient quilt for a sweet rainbow baby!
Fantastic – so glad it will be useful! Happy sewing!
Is there a full-sz pattern for this quilt?
Hi Phyllis, you can find a very similar pattern in my shop here.
Just came across this beautiful quilt but noticed that your blog is from 2014. Any chance the fabric used is still available either by the yard or in fat quarters?
Hi Elke, you’d have to Google and see if there’s any around but I doubt it. Elizabeth Olwen does still design fabric and I find that she uses similar colours in some of her fabric lines, so you might be able to find something more recent that will work well.
[…] fabric retailer Warp & Weft Heidi from Fabric Mutt Ren from The Inspired Wren Kirsty from Bonjour Quilts Carla from Half Dozen Daily Jennifer from Lea & Lars Heidi from Elegance & Elephants Shannon […]
I love the pattern, but discovered after ordering a fat quarter bundle from Hawthorne Threads that you can not cut four blocks 5.5 inches square from the 22 in side of the fat quarter. The fabric is exactly 22 inches wide, but once you cut off the salvage you are short one block by almost an inch. I was able to order another fat quarter bundle to complete my quilt. However, some people might nigh be able or want to invest in another $40 plus to complete the pattern.
Hi Donna, I’m sorry your fat quarter wasn’t fat enough! (Sorry, bad fat quarter joke). One other option to maximise your FQ is to cut your squares in a 3×3 configuration and then piece together the 10th square. Some people only want to cut ‘complete’ squares, (which could necessitate the need for more fabric) but if you’re comfortable with piecing that last one you can make it all fit.
All the best and happy sewing!
This is gorgeous :-)
The back of your quilt is fabulous! The front showcases the fabrics, but the back just pops, and was well worth the time and agony you put into it in my opinion (although I wasn’t the one doing it, so I guess I would say that! :) Thanks for sharing!
I love the simplicity of this quilt, but the back is even more over the top. Great job!
Love your new web design and this quilt is Gorge!! I think I like the back as much as the front. So lovely. I need to get back in quilting action. :)
Hillary
Beautiful quilt and love the fabrics!
Wow – your quilt is beautiful! The colour graduations make such an impact – I love that the simplicity of the design actually gives it such complexity!
Your quilt is great! I really would like to make one like it. Thank you for sharing the pattern. I think you did a great job of showing off Wildwood in an inventive way.
Beth
[email protected]
Beautiful, loved the front and oohhed and awwed over the back!
Beautiful quilt, love how you did the back! I love pieced backs!
Love the color gradations in this baby quilt. You did a wonderful job with these prints. CDahlgren at live dot com
Oh do I love your quilt!!
beautiful quilt! using the simple square patchwork is perfect to show off the beautiful prints and colors
Beautiful quilt! I love the backing and it definitely was worth the hard work, it’s brilliant too! Thank you for the pattern.
[…] We saw Jennifer Waaraniemi’s Super Tote at lea & lars, and Kirsty Cleverly’s Crib Quilt at Bonjour Quilts. Today we have Heidi Staples from Fabric Mutt with her hand-stitched Hexagon […]
Very pretty quilt. I love the colors and your scrappy binding.
I love this quilt. I can’t wait too make it.
Beautiful quilt, thanks for the tutorial!
So Lovely!
Gorgeous! I love the back, but I can see how it was probably a royal pain to make.
Kirsty this is a wonderful pattern to showcase fabric. I love the way you do colour graduation and your patterns are so detailed and well written.
Absolutely beautiful! Loved how you made a simple quilt so unique!
Wow what a beautiful quilt! The backing is awesome, even though it was a pain to piece::So Worth It.
Your quilt is beautiful! I love the placement of the fabric.
I LOVE the gradation in this quilt. It is sooo beautiful!!
Love the pattern for a baby quilt. My daughters and nieces like patterns that lean toward the traditional but with an update. This is perfect. The fabric colors are very pleasing to the eye.
Thanks for the chance to win as I have more than one quilt to make for the little ones!
It looks great. Did you have any issues with the quilt top not ending up square after the diagonal quilting? And did you quilt them all in one direction or did you alternate the direction when quilting? (I mean did you turn the quilt around so that you started the next line of quilting on the edge that you finished the last line of quilting on)
What a beautiful but simple quilt! Your fabric placement makes it!
Beautiful quilt!
Wonderful fabric gradation – my favorite color combinations.
The back is such a treat to look at too!
Well worth the trouble, the backing is just as lovely at the front. Great finish!
I really like this quilt and it looks easy enough for me to make. Thanks for the tutorial.
Such a pretty quilt…could use many different fabric lines. Thanks for sharing!
Love this quilt. Beautiful job!!!!!!!!
Love your Awesome Quilt! & colors are Beautiful!! Super job! & backing is cool!
Love it!
i like the front but I love scrappy backs, so fun. Such pretty fabric.
OH MY LANTA!!! This is absolutely GORGEOUS!! I must make one just like it. Thank you for the tutorial!
These are beautiful fabrics. Thanks for showing how you did the layout of the quilt. I like the backing you made too.
I love your quilt. I have a new grandson coming anyday now, these fabrics would be great for another boy.
I love this fabric, and your quilt is absolutely beautiful. Thanks!
Nice quilt, good way to tie the back in with the front fabrics.
Wow! You really did manage to show off the lovely fabrics so well! I love this collection. The blues and corals looks so lovely together. Wonderful job :)
I love it i have been looking for a great quilt pattern that uses fat quarters.
[…] a Super Tote from Jennifer Waaraniemi of lea & lars, and now we have Kirsty Cleverly from Bonjour Quilts. Kirsty recently showed us how to make the Suspended Square Block, but she was also busy working on […]
I love this fabric, love your quilt- diagonal lines look great! And I’m so glad you had navy and coral thread, it really looks great!
The color gradation is lovely. I also think the back is worthy of being another front . Bonus!
Such a lovely fabric line. Your quilt is gorgeous!
Oh my goodness, I love this quilt so much! I must get my hands on those fabrics. I’ve already copied your tutorial to my computer. It’s just scrumptious! Lovely!
Those fabrics are gorgeous and the baby quilt is wonderful. Simple but a very pretty pattern.
It’s bold and peaceful at the same time. Cloud 9 fabrics have such a lovely hand!
Love the baby quilt and the back may have been a pain, but so cute!
I loved your quilt and appreciated you sharing the pattern and the process. I loved the backing and quilting designs chosen too! It is truly reversible.
This is fabulous! I wish I had the patience to sew a quilt. Love that you incorporated the whole line. It’s so beautiful.
Love it!! The gradient is perfect for this collection. And the back is perfect. It may as well be the front. ;)
This really turned out Gorgeous!! Love the fresh look of the Color grading!
Now that is Really rather lovely … Nicely done m’dear!
[…] This would come together quickly for a gift quilt. Get the tutorial: Wildwood Challenge: Crib Quilt} […]
This is absolutely beautiful! That is a great fabric line.
Absolutely beautiful and thanks you for the tips.The bag is just an eye candy!!
Corals, blues and teals….such a pretty combo,
I like how you let the fabric shine with careful placement.
It’s gorgeous!
What a beautiful range of fabric- so soft but the navy makes it strong too! Lovely quilt, as usual Kirsty!
Great job, Kirsty! The quilting adds so much texture and makes it extra special! I love it!
Such a lovely Quilt, and I love the back, too!!! The quilting really adds another dimension to it and I Agree that this would be equally lovely for a boy or girl! :-)